First Dental Trip Abroad: What to Expect
By Adam Smith, Head of Patient Research
Updated 28 March 2026 · Dental tourism researcher · Clinic vetting specialist · 40+ clinics assessed on-site
Clinically reviewed by Dr. Ertan Etemoglu, Lead Dentist & Co-Founder
Tower Dental Clinic, Istanbul · 26 years in practice · 8,000+ patients/year · Turkish & American Dental Association member · Featured on Reuters
Tap a question — Pearl answers
Or ask me — I can…

Never been abroad for dental work? Here's exactly what happens from landing to flying home — a day-by-day walkthrough so nothing catches you off guard.
You've read the price comparisons. You've picked a clinic. You've booked flights. Now what?
The unknown is the scary part. Not the dentistry — most people have sat in a dental chair before. It's everything around it. The airport transfer. The first consultation. The waiting while the lab makes your crowns. The moment they put the temporary teeth in and you look in the mirror.
Here's what your first dental tourism trip actually looks like, day by day.
Before You Fly: The Week Before
5-7 days before:
- Confirm your appointment dates with the clinic via WhatsApp or email
- Send any outstanding X-rays or photos they've requested
- Print or screenshot your hotel booking, clinic address, and emergency contact numbers
- Download an offline map of your destination city (Google Maps allows offline downloads)
- Download a translation app (Google Translate works offline with downloaded language packs)
2-3 days before:
- Start any prescribed antibiotics if the clinic sent a pre-treatment protocol
- Pack your medications, painkillers (ibuprofen + paracetamol), and any dental records
- Charge your phone — you'll use it for navigation, translation, and clinic communication constantly
- Pack soft foods for the flight home (yoghurt pouches, protein shakes, soup) in case your mouth is sore
Day before:
- Eat a good meal. Depending on your treatment, you may be on soft food for several days
- Get a decent sleep. Anxiety is normal — it fades the moment you arrive
Day 1: Arrival and First Consultation
Morning/Afternoon: Arrival
Your clinic may offer airport transfer — a driver holding a sign with your name. If not, taxis from Istanbul airport to the city centre cost roughly £15-25 (Uber works in Istanbul). Budapest airport to city centre: £10-20.
Check into your hotel. Most dental tourism hotels are mid-range to upscale — clean, comfortable, English-speaking reception. Clinics often partner with specific hotels nearby.
Afternoon/Evening: First Consultation
This is the most important appointment. What happens:
-
Registration and medical history — forms about medications, allergies, health conditions. Similar to any UK dental practice but more thorough because they're seeing you for the first time.
-
Panoramic X-ray (OPG) — takes 30 seconds. A machine rotates around your head. Usually included free.
-
CBCT scan — if you're having implants, this 3D scan shows bone density and nerve positions. Takes 2 minutes. May cost £30-50 or be included.
-
Clinical examination — the dentist examines every tooth, checks your gums, reviews your X-rays on a large screen. They'll explain what they see in English (dental tourism clinics always have English-speaking dentists or translators).
-
Treatment plan discussion — they present their recommended plan, usually on a printed sheet or iPad showing each tooth and proposed treatment. This is where you compare against your home dentist's plan and ask questions.
-
Price confirmation — the quote you received before arrival should match. If extras are needed (bone graft, sinus lift), they'll explain why and quote the additional cost. You decide whether to proceed.
"Communication was excellent before I arrived but make sure you understand everything before treatment starts"
What to ask at the first consultation:
- "Is the treatment plan the same as what we discussed remotely?"
- "What implant brand will you use?" (get the specific name)
- "What material for the crowns/veneers?" (zirconia, E.max, composite?)
- "What's included in the price — medications, temporary teeth, follow-up?"
- "What happens if I'm not happy with the colour or fit?"
After the consultation: Go back to your hotel. Process the information. You do NOT need to start treatment the same day unless you choose to. Reputable clinics don't pressure you.
Day 2: Treatment Begins
For veneers/crowns:
- Tooth preparation (shaving down teeth to receive veneers or crowns)
- Digital scans or impressions sent to the lab
- Temporary veneers/crowns placed — you walk out with functional teeth
- Duration: 2-4 hours in the chair
For implants:
- Local anaesthesia or IV sedation
- Implant placement (30-60 minutes per implant)
- Stitches if needed
- Post-op instructions and prescriptions
- Duration: 1-3 hours depending on complexity
For All-on-4:
- IV sedation or general anaesthesia
- Remaining teeth extracted, implants placed, temporary bridge fitted
- Duration: 3-5 hours
- You'll leave with temporary teeth that same day
What it feels like: During treatment, nothing — anaesthesia works the same everywhere. Afterwards, dull pressure and mild swelling. Take the prescribed painkillers before the anaesthesia wears off, not after.
Day 3-4: The Waiting Days
If you're having lab-made restorations (crowns, veneers, bridges), the lab needs 24-72 hours. These are your free days.
What to do while waiting:
Istanbul:
- Bosphorus cruise — cheap ferry ride between continents
- Grand Bazaar and Spice Market — haggling is expected and fun
- Hagia Sophia and Blue Mosque — free entry to the mosque (head covering provided)
- Turkish bath (hammam) — but wait until your dentist says it's OK if you've had surgery
- Food — Istanbul's food scene rivals any European city. Try lahmacun, kebabs, baklava
Budapest:
- Széchenyi thermal baths — Europe's largest thermal bath complex
- Parliament building tour
- Ruin bars in the Jewish Quarter
- Danube evening cruise
- Central Market Hall — street food and souvenirs
Antalya:
- Düden Waterfalls
- Old Town (Kaleiçi) — charming narrow streets
- Beach day — Mediterranean coast
- Day trip to ancient Perge or Aspendos ruins
Recovery tips for these days:
- Stick to soft food — soup, yoghurt, pasta, scrambled eggs
- Take painkillers on schedule, not just when pain appears
- Ice your face 20 minutes on, 20 minutes off for swelling
- Sleep with your head elevated (extra pillow)
- No alcohol for 48 hours minimum (interferes with healing and blood clotting)
Day 5-6: Fitting Day
For veneers/crowns:
This is the big day. The lab work arrives and the dentist fits your permanent restorations.
- Try-in: Temporary teeth removed, permanent ones placed temporarily to check fit and colour
- Adjustments: Bite checked, minor shaping if needed, colour reviewed
- Your input matters: Look at the teeth in a mirror. Check them in natural light (ask to go near a window). If the colour or shape isn't right, say so now — changes are much harder after bonding
- Final bonding/cementation: Once you approve, the permanent restorations are bonded. This is irreversible for veneers.
"Did you approve them before they were permanently fitted? Always check in natural daylight"
Duration: 2-4 hours for the full fitting process.
For implant patients: Day 5-6 is typically a follow-up check — ensuring the surgical site is healing properly, stitches are intact, no signs of infection. The permanent crown on the implant comes months later (separate trip).
Day 7: Final Check and Departure
Morning:
- Quick final appointment — dentist checks everything one last time
- You receive aftercare instructions (written, in English)
- You receive any warranties or guarantees in writing
- For implant patients: implant passport with brand, model, serial number
- Photos of your new teeth (the clinic usually takes before/after shots)
Packing for the flight home:
- Keep painkillers in your hand luggage
- Soft snacks for the plane
- Neck pillow (you'll want to keep your head elevated)
- Gauze pads if you've had extractions or surgery
- Water bottle (fill after security — stay hydrated)
On the plane:
- Take ibuprofen 30 minutes before boarding
- Avoid very hot or cold drinks
- Don't chew gum
- Bite on gauze during takeoff/landing if you've had extractions in the past 3 days
Back Home: The First Week
Day 1-3 home:
- Continue prescribed medications
- Soft food diet (gradually reintroduce harder foods)
- Mild swelling is normal — it should be reducing, not increasing
- Take photos of your healing progress
Day 7-10:
- Swelling should be fully resolved
- Stitches dissolve (or you visit a local dentist for removal if non-dissolvable)
- You can eat normally
- Sensitivity to hot/cold is normal and fades over 2-4 weeks
First UK dentist visit (optional but recommended): Book a check-up with your UK dentist 4-6 weeks after treatment. They can verify the work and create a record for future reference. Bring your implant passport and treatment summary from the Turkish/Hungarian clinic.
The Emotional Timeline (Nobody Talks About This)
- Before the trip: Anxiety, excitement, "am I making a mistake?"
- Day 1 at clinic: Relief. It's professional. It's real. The staff are friendly.
- Day 2 (treatment): Nervous but handled. No different from a UK dental visit.
- Day 3-4 (waiting): Relaxed. Enjoying the city. Almost forget why you're there.
- Day 5 (fitting): Emotional. You see your new teeth for the first time. Many people cry.
- Day 7 (going home): Proud. You did it. You saved thousands and got quality work.
- Week 2 home: Telling everyone about it. Friends asking for the clinic name.
Getting Started
The first step is understanding what treatment you need. Our dental assessment creates an Intelligent Treatment Plan based on your dental chart — then you compare real clinic prices and can start planning your trip with clarity.
See also: All-on-4 Guide
Next Steps
Start by building your dental package — 2 minutes, no commitment. The savings calculator shows verified clinic prices vs home costs. Your dental tourism consultant coordinates everything once you're ready.
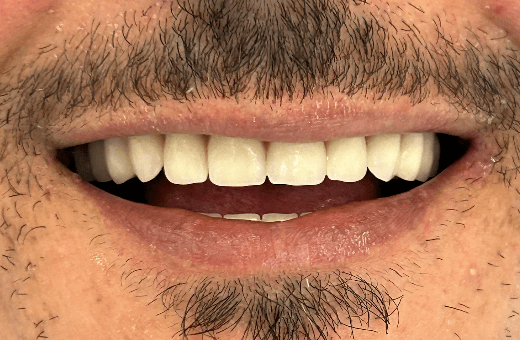
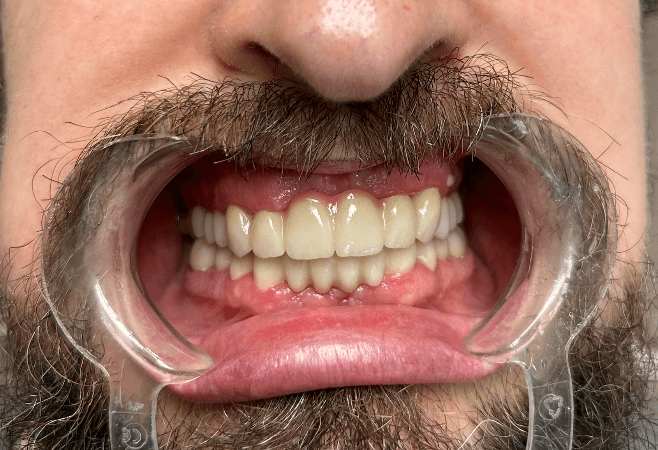
Real results from verified clinics
Drag the slider to compare before & after

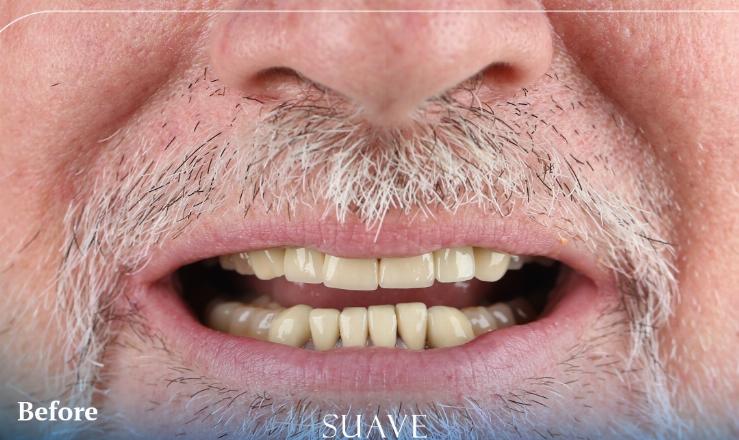
Suave Clinic
Verified clinicFull smile restoration · Istanbul
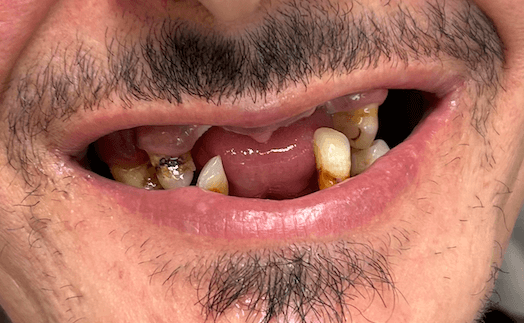
MDental Clinic
Verified clinicFull smile makeover · E-max veneers · Budapest
MDental Clinic
Verified clinicCrowns & restoration · Budapest
 Before → After
Tower Dental Clinic
Verified clinicHollywood smile · E-max veneers · Istanbul
References & Sources
All clinical claims, pricing data, and statistics in this article are based on peer-reviewed research, official regulatory sources, and publicly verifiable data. We invite you to verify anything before making a treatment decision.
- 1.BBC News, "Turkey teeth: The dental tourism risks patients don't see." February 2023.
- 2.BBC, "Turkey Teeth: Bargain Smiles or Big Mistake?" — documentary investigating dental tourism risks, 2022.
- 3.Euronews, "Medical tourism: Dental expert explains why Turkey teeth can be a costly mistake." October 2024.
- 4.General Dental Council (UK), "Going abroad for dental treatment" — patient guidance.
- 5.British Dental Association (BDA), "Dental tourism: Patients need to know the risks."
- 6.T.C. Saglik Bakanligi (Turkish Ministry of Health), Health Tourism Authorisation Regulations.
- 7.Kontakiotis, E.G. et al. (2015), "A prospective study of the incidence of asymptomatic pulp necrosis following crown preparation," Int. Endod. J., 48(6), 512-517.
- 8.Pjetursson, B.E. et al. (2012), "A systematic review of the survival and complication rates of implant-supported fixed dental prostheses after at least 5 years," Clin. Oral Implants Res., 23(S6), 22-38.
- 9.Sailer, I. et al. (2015), "All-ceramic or metal-ceramic tooth-supported fixed dental prostheses: a systematic review," Dent. Mater., 31(6), 603-624.
- 10.Türkiye Today, "1.5 million health tourists visited Türkiye in 2024, generating $3 billion in revenue." 2025.
Medical disclaimer: This article is for educational purposes and does not replace a clinical examination. Treatment outcomes vary between patients. Always consult a qualified dental professional.
About MyDentalFly
MyDentalFly is a UK-based platform that builds your treatment plan and matches you with vetted specialist clinics abroad — and a dentist at the clinic reviews and confirms every plan before you pay anything.
Our interactive assessment evaluates your dental needs and builds a bespoke package: every treatment explained, a matched clinic with reasons why, your named dentist, flight estimates, transport, and accommodation — all in one place. We maintain a small, vetted network across Turkey, Hungary and Poland, visit clinics in person, help arrange CBCT scans before you fly, and stay with you through the entire journey. Compare. Save. Smile.
Tap a question — Pearl answers
Prefer a person? WhatsApp us · 020 4634 2312 · or
Clinically reviewed before booking
Every dental package built on MyDentalFly is reviewed by a qualified dentist before it gets accepted. Our clinical reviewers include specialists like Dr. Hubert Trępatowski — 800+ All-on-4 procedures, trained under Professor Paulo Malo (pioneer of the All-on-4 technique), graduate of Jagiellonian University Medical Faculty, Krakow.
About the author
Adam Smith
Head of Patient Research, MyDentalFly
Adam leads patient research at MyDentalFly, personally vetting clinics across Turkey, Hungary, and Poland. He has reviewed over 200 clinic proposals, analysed patient outcomes, and helped coordinate treatment plans for patients across the UK, USA, and Europe.
Clinically reviewed by
Dr. Ertan Etemoglu
Lead Dentist & Co-Founder, Tower Dental Clinic
26 years in practice · 8,000+ patients/year · Turkish & American Dental Association member · Featured on Reuters
Content last reviewed: 14 July 2026


